Git sync
Git sync lets Windmill workspaces be tracked by git. Each time an item is deployed, Widnmill will create and push a commit to the specified repository. It is also possible, and recommended, to setup CI/CD actions that will deploy items on windmill when a new commit is detected, enabling bi-directional synchronization.
For all details on Version control in Windmill, see Version control.
This feature is Cloud & Enterprise Self-Hosted only.

Setup - Git sync from Windmill
This video shows how to set up a Git repository for a workspace.
1. Initialize Git repository
First, create a Git repository to store your Windmill workspace:
Option A: Create empty repository (Recommended)
Create an empty Git repository on your Git provider (GitHub, GitLab, etc.) without any initial files. Windmill will populate it automatically in the next step.
Option B: Manual CLI setup
For more control, you can set up the repository manually using the Windmill CLI:
- Use Windmill CLI to pull the workspace locally:
wmill sync pull
Configure your wmill.yaml file with the desired filter settings before pushing to Git.

- Create a Git repository (in the example, on GitHub) and push the initial workspace content:
git init
git remote add origin https://github.com/username/reponame.git
git add .
git commit -m 'Initial commit'
git push -u origin main
You now have your Windmill workspace on a GitHub repository.
2. Setup in Windmill
- Go to workspace settings → Git Sync tab
- Click + Add connection
- Create or select a git_repository resource pointing to your Git repository. You have two authentication options:
- GitHub App: Use the GitHub App for simplified authentication and enhanced security
- Personal Access Token: Use a token with Read-and-write on "Contents". Your URL should be
https://[USERNAME]:[TOKEN]@github.com/[ORG|USER]/[REPO_NAME].git
- Complete the configuration of the connection and save

If you chose Option A (empty repository), use the "Initialize Git repository" operation to automatically:
- Create the
wmill.yamlconfiguration file with your filter settings - Push the entire workspace content to the Git repository
If the repository already contains a wmill.yaml file, the settings will be automatically imported and applied to your workspace configuration.
Configuration settings: Git sync filter settings are pulled from the wmill.yaml file in your repository. Once the connection is saved, you can update settings by changing wmill.yaml and pulling the settings via the corresponding button.

Signing commits with GPG
If your repo requires signed commits, you can set up GPG on your Windmill instance.
- Generate a GPG key pair:
gpg --full-generate-key
- Add the key to your GitHub account:
gpg --armor --export <key_id>
Go to your GitHub account settings => "SSH and GPG keys" and add the GPG public key.
- Add the private key to your Windmill instance:
gpg --armor --export-keys <key_id>
In the Windmill workspace "Git Sync" settings, edit the "GPG key" field with the GPG private key. Use the email address associated with the key and set the passphrase if you added one.

Make sure to double check that the email address associated with the key is the same as the one you use to commit to the repo. Furthermore, double check that the key id is the same as the one you see in the "GPG key" field on your GitHub account.
All commits will now be signed and commited as the user matching the email address associated with the key.
Azure DevOps with Service Principal setup
In Microsoft Entra ID, create an application and a secret (also known as Service Principal - an identity used by applications to access Azure resources).
Create an azure resource on your Windmill instance with the application's client_id, client_secret and tenant_id.
On Azure DevOps, add the application to the DevOps organization with the appropriate permissions.
In Git sync settings of your Windmill instance, define a new repository with URL:
https://AZURE_DEVOPS_TOKEN(<path_to_the_azure_resource>)@dev.azure.com/<organization>/<project>/_git/<repository>
Setup - CI/CD from git repository
To allow for bidirectional sync, CI/CD can be configured to sync back changes to Windmill anytime a commit is made.
Github Actions
- Add GitHub Actions to your repository. You will find the necessary actions in the windmill-sync-example repository.
- Create a
.github/workflowsdirectory in your repository and add the following files:open-pr-on-fork-commit.yaml: This action automatically creates a PR when Windmill commits a change to a workspace fork. Workspace forks are explained in a section below.push-on-merge.yaml: This action automatically pushes the content of the repo to the Windmill prod workspace when a PR is merged. Update theWMILL_WORKSPACEvariable to the name of your prod workspace.- Optionnaly, if you want to add a staging workspace, copy the previous GitHub action/workflow file but now set the
WMILL_WORKSPACEvariable to the id of the staging workspace and theWMILL_URLvariable to the base URL of the Windmill instance if different than the one for prod. Also changes the trigger to listen to the branches: 'staging'. push-on-merge-to-forks.yaml: This does the same aspush-on-merge.yamlbut for all Workspace Forks, enabling the full power of the feature.
- In GitHub, allow actions to create and approve pull requests.
- Create a user token in Windmill and save it as a secret named
WMILL_TOKENin your GitHub repository Settings > "Secret and Variable" > "Actions".
On top of WMILL_TOKEN, 2 other variables need to be set in the GitHub action workflow file:
WMILL_WORKSPACE: the name of the workspaceWMILL_URL: the base URL of the Windmill instance (e.g. https://app.windmill.dev/)
- open-pr-on-commit.yaml
- push-on-merge.yaml
- push-on-merge-to-forks.yaml
name: "Open pull request for workspace forks"
on:
  push:
    branches:
      - wm-fork/**

env:
TARGET_BRANCH: main

jobs:
submit_pull_requests:
runs-on: ubuntu-latest
permissions:
contents: read
pull-requests: write

    steps:
      - uses: actions/checkout@v4
      - name: Create pull request
        run: |
          gh pr view ${{ github.ref_name }} \
          && gh pr reopen ${{ github.ref_name }} \
          || gh pr create -B ${{ env.TARGET_BRANCH }} -H ${{ github.ref_name }} \
          --title "${{github.event.head_commit.message }}" \
          --body "PR created by Github action '${{ github.workflow }}'"
        env:
          GITHUB_TOKEN: ${{ secrets.GITHUB_TOKEN }}
name: "Push main to Windmill workspace"
on:
  workflow_dispatch:
  push:
    branches:
      - "main"
    # if the windmill workspace is persisted in a subfolder of this repos, you can add the following to avoid pushing to windmill when there's no change
    # paths:
    #   - wm/**

env:
  WMILL_URL: https://app.windmill.dev/
  WMILL_WORKSPACE: github-sync-example-prod

jobs:
  sync:
    environment: windmill
    runs-on: "ubuntu-latest"
    steps:
      - name: Checkout
        uses: actions/checkout@v3

      - uses: actions/setup-node@v4
        with:
          node-version: 20

      # We check the commit to make sure it doesn't start with [WM] which commits coming from Windmill Git Sync do.\
      # If that's the case, then we stop the workflow as we want to avoid overwriting changes that are out-of-sync
      # (for instance if one were to deploy in quick succession)
      - name: Check commit message
        id: check_message
        run: |
          COMMIT_MESSAGE="${{ github.event.head_commit.message }}"
          if [[ "$COMMIT_MESSAGE" =~ ^\[WM\] ]]; then
            echo "Commit message starts with '[WM]', skipping push to Windmill to avoid overwriting deploy that immediately follows it"
            echo "skip=skip" >> $GITHUB_OUTPUT
          fi

      # (push will pull first to detect conflicts and only push actual changes)
      - name: Push changes
        if: steps.check_message.outputs.skip != 'skip'
        run: |
          npm install -g windmill-cli@1.393.3
          wmill sync push --yes --skip-variables --skip-secrets --skip-resources --workspace ${{ env.WMILL_WORKSPACE }} --token ${{ secrets.WMILL_TOKEN }} --base-url ${{ env.WMILL_URL }}
name: "Push forks to Windmill workspace forks"
on:
  workflow_dispatch:
  push:
    branches:
      - wm-fork/**

env:
WMILL_URL: https://app.windmill.dev/

jobs:
sync:
environment: windmill
runs-on: "ubuntu-latest"
steps: - name: Checkout
uses: actions/checkout@v3

      - uses: actions/setup-node@v4
        with:
          node-version: 20

      - name: Extract workspace from branch name
        id: workspace
        run: |
          BRANCH_NAME=${GITHUB_REF#refs/heads/}
          WORKSPACE=$(echo "$BRANCH_NAME" | sed 's|wm-fork/|wm-fork-|' | sed 's|/|-|g')
          echo "workspace=$WORKSPACE" >> $GITHUB_OUTPUT

      # We check the commit to make sure it doesn't start with [WM] which commits coming from Windmill Git Sync do.\
      # If that's the case, then we stop the workflow as we want to avoid overwriting changes that are out-of-sync
      # (for instance if one were to deploy in quick succession)
      - name: Check commit message
        id: check_message
        run: |
          COMMIT_MESSAGE="${{ github.event.head_commit.message }}"
          if [[ "$COMMIT_MESSAGE" =~ ^\[WM\] ]]; then
            echo "Commit message starts with '[WM]', skipping push to Windmill to avoid overwriting deploy that immediately follows it"
            echo "skip=skip" >> $GITHUB_OUTPUT
          fi

      # (push will pull first to detect conflicts and only push actual changes)
      - name: Push changes
        if: steps.check_message.outputs.skip != 'skip'
        run: |
          npm install -g windmill-cli@1.393.3
          wmill sync push --yes --skip-variables --skip-secrets --skip-resources --workspace ${{ steps.workspace.outputs.workspace }} --token ${{ secrets.WMILL_TOKEN }} --base-url ${{ env.WMILL_URL }}
Other Git hosting platforms
If you are using a different git hosting platform, such as GitLab or Codeberg, you just need to setup similar actions in your CI/CD. There are currently no detailed instructions for other platforms so you will need to use the provided GitHub ones and adpapt it to your needs.
Filters
Path filters
Only scripts, flows and apps with their path matching one of the set filters will be synced to the Git repositories below. The filters allow * and ** characters, with * matching any character allowed in paths until the next slash (/) and ** matching anything including slashes.
By default everything in folders (with rule f/**) will be synced.
You can configure:
- Include paths: Primary patterns for what to sync (e.g.,
f/**) - Exclude paths: Patterns to exclude after include checks
Type filters
On top of the filter path above, you can include only certain type of object to be synced with the Git repository. By default everything is synced.
You can filter on:
- Scripts - Individual scripts
- Flows - Workflow definitions
- Apps - Application definitions
- Folders - Folder structure
- Resources - Resource instances
- Variables - Workspace variables
- Include secrets - Option to include secret variables
- Schedules - Scheduled job definitions
- Resource types
- Users - User definitions
- Groups - Group definitions
- Triggers - Event triggers (HTTP routes, WebSocket, Postgres, Kafka, NATS, SQS, GCP Pub/Sub, MQTT)
- Workspace settings - Global workspace configuration
- Encryption key - Workspace encryption key
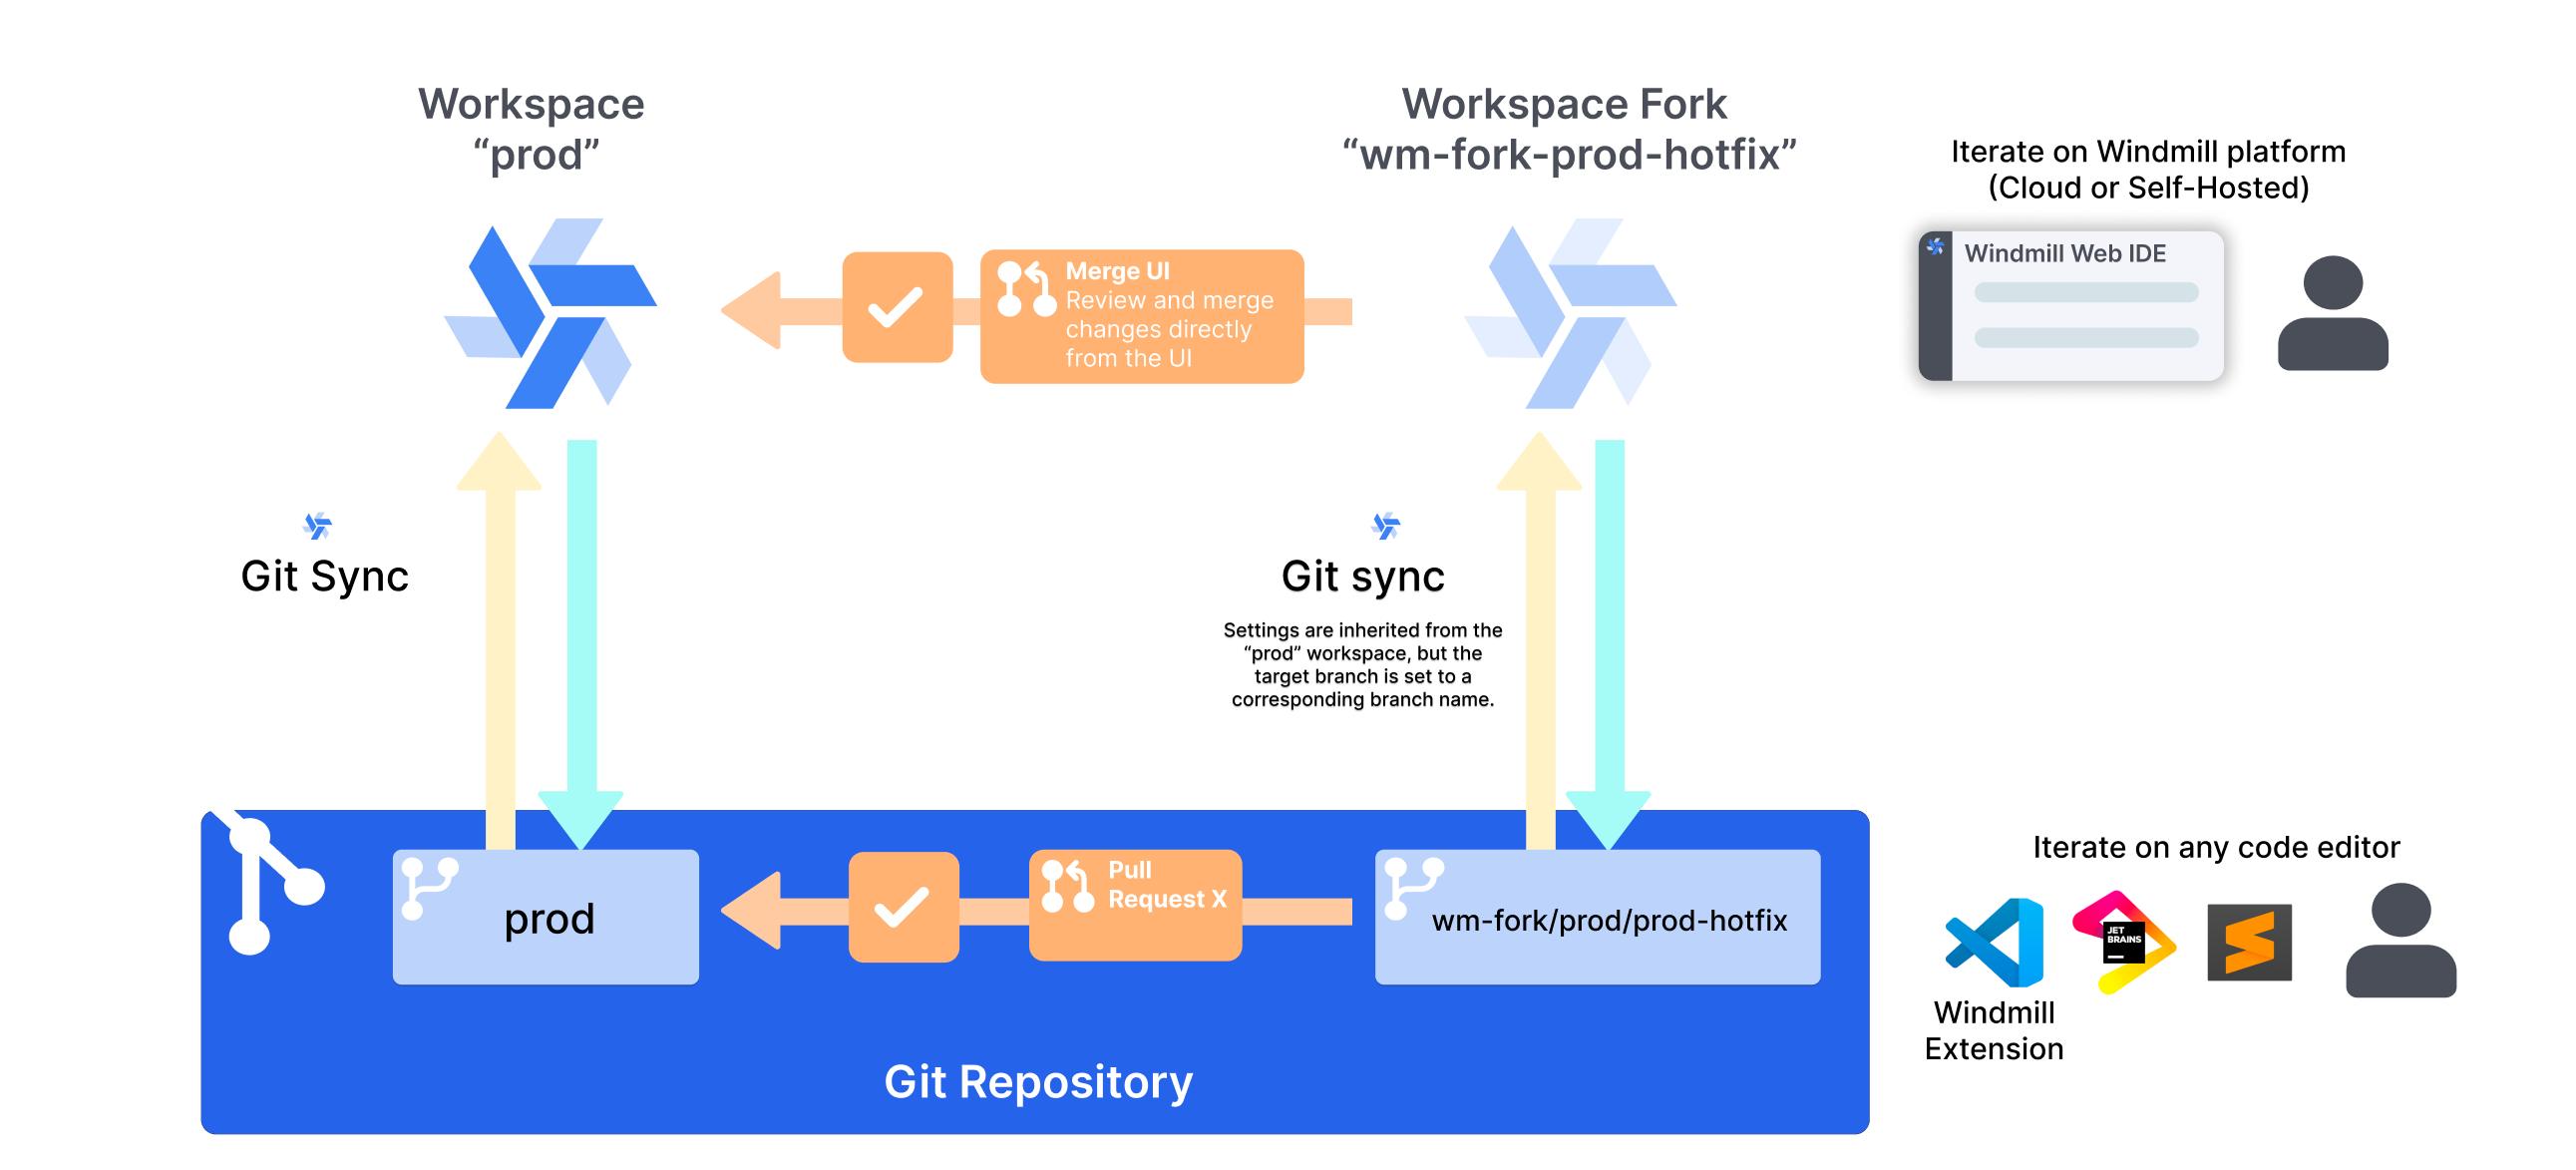
Workspace forks integration
Git sync automatically creates corresponding git branches for workspace forks. When you fork a workspace with git sync enabled, Windmill creates a branch with the naming pattern wm-fork/<parent-branch>/<fork-name> and keeps it synchronized with the forked workspace.
This enables parallel development workflows where multiple developers can work on separate workspace forks, each with its own git branch, and merge changes back to the parent workspace either through the UI or via pull requests.
Adding secondary sync repositories
You can add secondary sync repositories if you need to. Just go to Git sync settings, press + Add secondary sync repo and follow the same instructions as for the first one. Note that having multiple bidirectional repositories is not currently supported, secondary repositories can only act as read-only copies of the workspace.
Repository operations
Each configured repository supports several operations:
- Test connection: Verify repository access and credentials
- Preview changes: Perform a dry-run to see what would be synced
- Push to repository: Send workspace content to git repository
- Pull from repository: Get changes from git repository to workspace
- Pull settings: Get only wmill.yaml configuration changes
- Initialize repository: Set up new git repository with Windmill structure
wmill.yaml integration
Git sync settings can be controlled via the wmill.yaml file in your repository root. This enables:
- CLI compatibility: Settings configured in the UI are compatible with Windmill CLI
- Version-controlled configuration: Your sync settings are stored in git alongside your code
- Branch-specific overrides: Different sync behavior per git branch
- Git Promotion-specific settings: Special configuration for deployment workflows
- Branch-specific items: Different versions of resources and variables per git branch for environment-specific configurations
The frontend will detect existing wmill.yaml files and merge settings appropriately.
Exclude specific types for this repository only
You can exclude specific types per repository, overriding the global workspace filters.
Git Promotion workflow: Cross-instance deployment using a git workflow
One option you will see in the Git Sync settings tab, is to add a Git Promotion target. This is an advanced setup that leverages the feature to create deployements from one workspace to another.
Learn how to setup Git Promotion: